고정 헤더 영역
상세 컨텐츠
본문
반응형
비동기(Asynchronous)
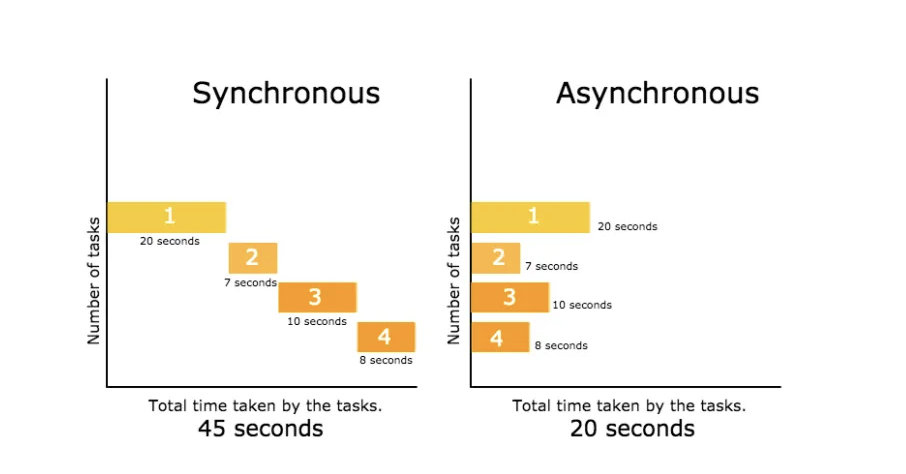
비동기로 요청을 처리하면 작업이 순차적으로 이루어지는 것이 아닌 병렬적으로 처리한다는 뜻이다.
@Async
Spring에서는 간단히 비동기를 구현할 수 있도록 @Async 어노테이션을 제공한다.
- @Async는 기본적으로 스프링 AOP에 의해 프록시 패턴 기반으로 동작한다.
- @Async은 메서드에 적용해 해당 메서드를 비동기적으로 실행하게 한다.
- TaskExecutor 빈을 사용해 스레드 풀을 구성할 수 있다.
- return 값을 Future / ListenableFuture / CompletableFuture로 반환할 수 있다.
최종적으로는 CompletableFuture와 @Async를 함께 사용하여 N개의 Task를 병렬처리할 것이다.
동작원리
- @Async 어노테이션이 붙은 메서드가 호출되면, 스프링은 해당 호출을 가로채서 비동기 실행을 처리하기 위한 프록시 객체를 생성한다.
- 해당 메서드는 TaskExecutor에 의해 스레드풀에 작업으로 등록한다.
- 해당 메서드는 별도의 스레드에서 작업이 진행되며, 호출자 메서드는 블러킹되지 않고 즉시 리턴된다.
주의사항
- public 메서드에서만 적용 가능하다.
▶ proxy에서는 private으로 접근 불가하기 때문이다. - 자가 호출(self-invocation)은 불가능하다.
▶ 자가 호출 시 proxy를 거치지 않기 때문이다. - @Async는 기본적으로 void만 반환한다.
▶ 비동기 스레드에서 발생한 Error는 메인까지 반환하지 못하므로, 메서드 내에서 별도로 처리하거나 ListenableFuture / CompletableFuture로 반환해 처리해야 한다.
Future
Future은 비동기 블로킹방식이므로 잘 사용하지 않는다.
ListenableFuture
ListenableFuture은 콜백 메서드를 통해 논블로킹 처리가 가능하다. 첫 번째 파라미터는 성공 시 실행할 것을, 두 번째 파라미터는 실패 시 실행할 것을 지정해 주면 된다.
CompletableFuture
CompletableFuture은 Java 8에서 추가된 클래스로, 비동기 작업의 결과를 처리하기 위한 기능을 제공한다. 비동기 작업 이후의 연결, 조합, 변환을 처리할 수 있다.
AsyncConfiguration.java
import java.util.concurrent.Executor;
import java.util.concurrent.ThreadPoolExecutor;

import org.springframework.aop.interceptor.AsyncUncaughtExceptionHandler;
import org.springframework.context.annotation.Bean;
import org.springframework.context.annotation.Configuration;
import org.springframework.scheduling.annotation.AsyncConfigurer;
import org.springframework.scheduling.annotation.EnableAsync;
import org.springframework.scheduling.concurrent.ThreadPoolTaskExecutor;

import com.devlog.common.exception.AsyncExceptionHandler;

@EnableAsync
@Configuration
public class AsyncConfiguration implements AsyncConfigurer{

    @Bean(name = "asyncThreadPoolTaskExecutor")
    public Executor threadPoolTaskExecutor(){
        ThreadPoolTaskExecutor taskExecutor = new ThreadPoolTaskExecutor();

        taskExecutor.setCorePoolSize(5);
        taskExecutor.setMaxPoolSize(20);
        taskExecutor.setQueueCapacity(100);
        taskExecutor.setThreadNamePrefix("asyncThreadPoolTaskExecutor-");

        taskExecutor.setRejectedExecutionHandler(new ThreadPoolExecutor.CallerRunsPolicy());

        taskExecutor.initialize();
        return taskExecutor;
    }
}
AsyncConfigurer 인터페이스를 구현하여 별도의 TaskExecutor를 설정한다.
별도의 TaskExecutor를 설정을 해주지 않으면, SimpleAsyncTaskExecutor가 기본적으로 사용된다.
SimpleAsyncTaskExecutor는 스레드 풀을 사용하지 않고, 매 요청마다 새로운 스레드를 생성해 작업을 수행한다.
따라서 스레드 풀 기반의 TaskExecutor을 사용하도록 설정해야 한다.
명시적으로 적지 않아도 빈으로 등록될 때 initialize()한다.
ThreadPoolTaskExecutor 설정
- CorePoolSize
스레드 풀에 항상 살아있는 최소 스레드 수 - MaxPoolSize
스레드 풀이 확장할 수 있는 최대 스레드 수 - QueueCapacity
스레드 풀에서 사용할 최대 큐의 크기 - ThreadNamePrefix
생성된 각 스레드의 이름 접두사 - RejectedExecutionHandler
ThreadPoolTaskExecutor에서 스레드풀 내에서 더 이상 작업을 처리할 수 없을 때의 예외 처리 전략을 설정한다.
AbortPolicy
RejectedException을 발생시키며 종료한다. RejectedExecutionHandler의 Default설정값이다.
CallerRunsPolicy
Async 메서드를 불렀던 메인 스레드에서 처리한다.
DiscardPolicy
Reject 된 Task에 대해 어떠한 작업도 하지 않는다.
DiscardOldestPolicy
큐에 있는 가장 오래된 Task을 삭제하고 새로운 요청을 받아들인다.
예외처리 Handler 생성 (반환 값이 void인 경우)
@EnableAsync
@Configuration
public class AsyncConfiguration implements AsyncConfigurer{

    @Override
    public AsyncUncaughtExceptionHandler getAsyncUncaughtExceptionHandler(){
        //Custom Exception
        return new AsyncExceptionHandler();
    }
}
반환 값이 void인 경우 예외는 호출 스레드에 전달되지 않는다.
getAsyncUncaughtExceptionHandler을 Override 하여 호출 스레드에 전달될 수 있도록 설정한다.
AsyncExceptionHandler.java
@Slf4j
public class AsyncExceptionHandler implements AsyncUncaughtExceptionHandler{

    @Override
    public void handleUncaughtException(Throwable ex, Method method, Object... params) {
        log.error( ex.getMessage(), ex);
    }

}
@Async 적용 메서드 작성
1) 반환값이 없는(void) 경우
@RequestMapping("/VoidAsync")
public ResponseEntity<Void> voidAsync(@RequestParam Map<String, Object> paramMap) {
    log.info("=============================voidAsync START==============================");
    for(int i = 0 ; i < 5 ; i++){
        asyncService.voidAsyncMethod(i);
    }
    log.info("=============================voidAsync END==============================");

    return ResponseEntity.ok().build();
}
@Slf4j
@Service
@RequiredArgsConstructor
public class AsyncService {

    @Async("asyncThreadPoolTaskExecutor")
    public void voidAsyncMethod(int number){
        if (number % 2 != 0){
            log.info(String.format("[%s] Exception", number));
            throw new RuntimeException();
        }
        log.info("Thread Name : " + Thread.currentThread().getName());
    }
}
- @Async 설정 시 taskExecutor의 Bean 이름과 동일하게 맞춰준다.
반환 값이 void인 경우 예외는 호출 스레드에 전달되지 않는다.
getAsyncUncaughtExceptionHandler을 Override 하여 호출 스레드에 전달될 수 있도록 설정한다.
Output

- START, END 로그가 먼저 출력되고 @Async 메서드 출력됨 (비동기처리 확인)
- Config파일에서 설정한 prefix로 Thread명이 설정된 것 확인
- Thread명이 병렬처리 된 것 확인
- @Async 메서드에서 발생한 Exception을 AsyncExceptionHandler에 의해 출력되는 것을 확인
2) ListenableFuture로 return 값 설정
@RequestMapping("/ListenableFutureAsyncMethod")
public ResponseEntity<Void> listenableFutureAsyncMethod(@RequestParam Map<String, Object> paramMap) {

    log.info("=============================listenableFutureAsyncMethod START==============================");
    for (int i = 1; i <=10; i++){
        ListenableFuture<String> listenableFuture = asyncService.listenableFutureAsyncMethod(i);
        listenableFuture.addCallback(result -> log.info(result),
            		                  error -> error.printStackTrace());
        /*
         * addCallback(success, failure)
         * addCallback(ListenableFutureCallback 구현)
         */
    }
    log.info("=============================listenableFutureAsyncMethod END==============================");

    return ResponseEntity.ok().build();
}
addCallback메서드의 첫 번째 파라미터는 성공 시 실행할 것을, 두 번째 파라미터는 실패 시 실행할 것을 지정해 주면 된다.
@Slf4j
@Service
@RequiredArgsConstructor
public class AsyncService {

    @Async("asyncThreadPoolTaskExecutor")
    public ListenableFuture<String> listenableFutureAsyncMethod(int number){
        if (number % 2 != 0){
            throw new RuntimeException();
        }
        return new AsyncResult<>("성공" + number);
    }
}
Output
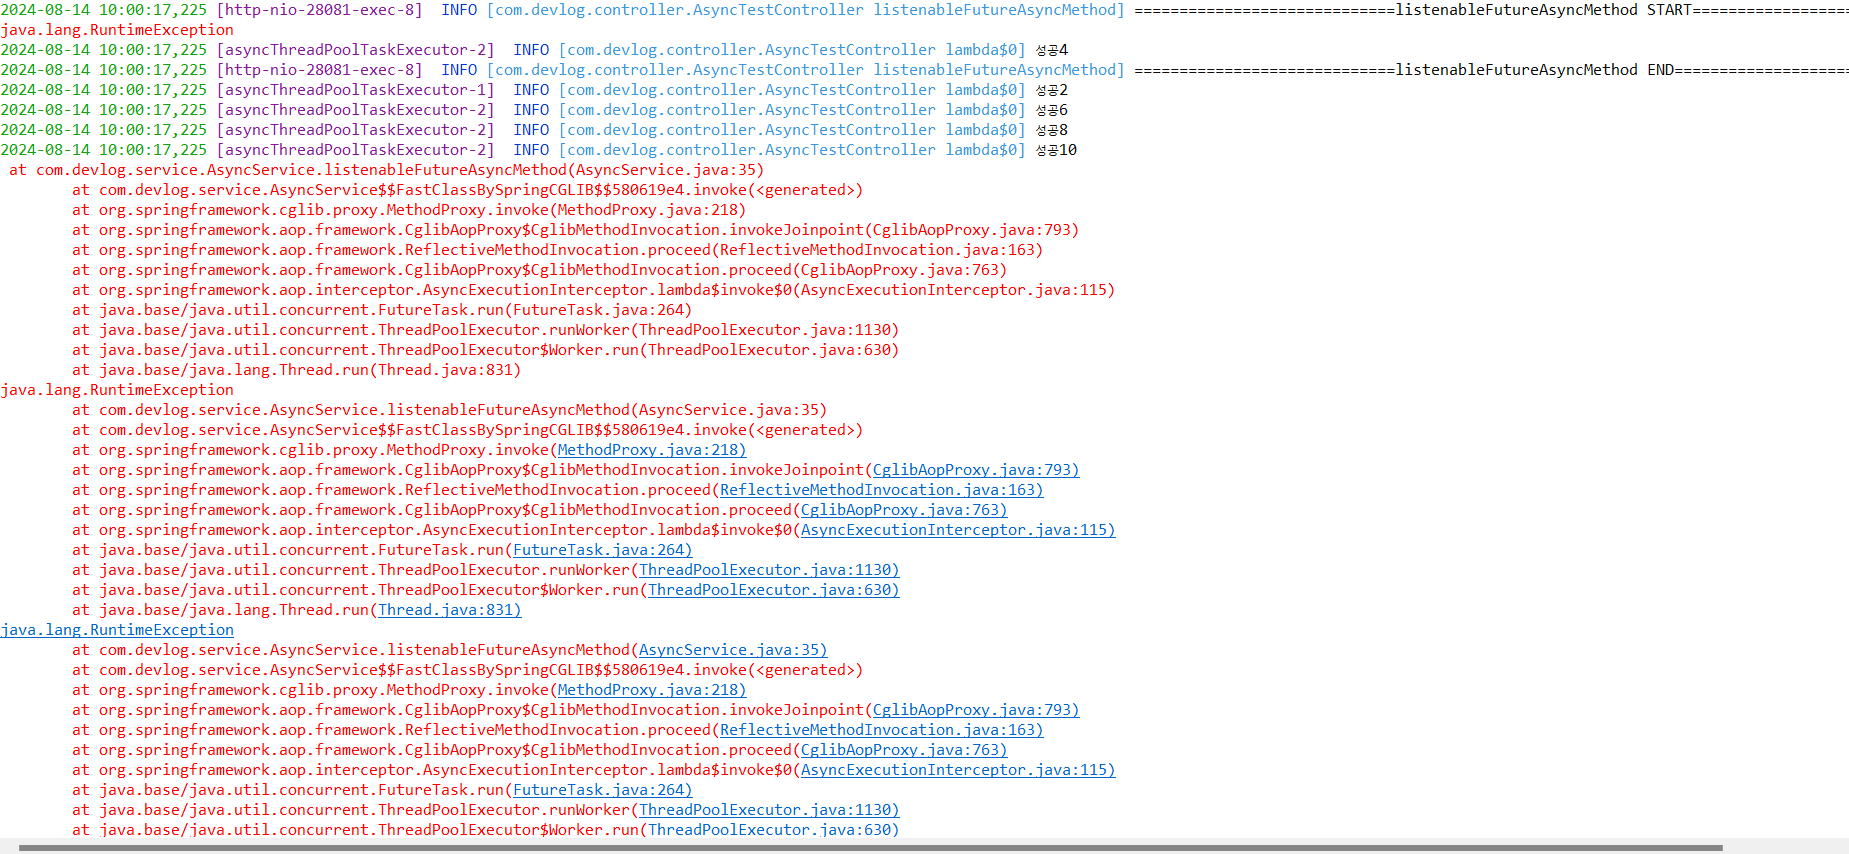
addCallback 메서드를 사용하여 호출 스레드에서 성공, 실패를 제어할 수 있
3) CompletableFuture로 return 값 설정
@RequestMapping("/CompletableFutureAsyncMethod")
public ResponseEntity<Void> completableFutureAsyncMethod(@RequestParam Map<String, Object> paramMap) {

    log.info("=============================completableFutureAsyncMethod START==============================");
    List<CompletableFuture<String>> completableFutureList = new ArrayList<CompletableFuture<String>>();
    for (int i = 1; i <=30; i++){
        CompletableFuture<String> result = asyncService.completableFutureAsyncMethod(i);
        completableFutureList.add(result);
    }

    List<String> resultList = CompletableFuture.allOf(completableFutureList.toArray(new CompletableFuture[completableFutureList.size()]))
                                               .thenApply(result -> completableFutureList.stream()
                                                                                         .map(completableFuture -> completableFuture.join())
                                                                                         .collect(Collectors.toList()))
                                               .join();
    log.info(resultList.toString());
    log.info("=============================completableFutureAsyncMethod END==============================");

    return ResponseEntity.ok().build();
}
allOf 메서드를 사용하면 여러 개의 CompletableFuture을 동시에 실행하고, 모든 작업 결과에 콜백을 실행한다.
하지만, 모든 CompletableFuture의 결과를 결합한 결괏값을 반환할 수 없는 한계가 있다.
join 메서드를 활용하여 allOf 메서드의 한계를 극복할 수 있다.
CompletableFuture의 결과가 사용 가능할 때까지 기다리며 결과가 사용 가능해지면 그 결과를 반환한다.
단, CompletableFuture가 정상적으로 완료되지 않을 경우 UncheckedExecutionException이 발생할 수 있다 는 것을 고려해야 한다.
@Slf4j
@Service
@RequiredArgsConstructor
public class AsyncService {

    @Async("asyncThreadPoolTaskExecutor")
    public CompletableFuture<String> completableFutureAsyncMethod(int number){
        try {
            if (number % 2 != 0){
                log.info(String.format("[%s] RuntimeException", number));
                throw new RuntimeException();
            }
            return CompletableFuture.completedFuture("성공" + number );
        }catch (Exception e) {
            return CompletableFuture.completedFuture("실패" + number );
        }
    }
}
Output

호출 스레드가 모든 Task의 수행결과를 기다린 후 수행되는 것을 START, END 로그로 확인할 수 있다.
CompletableFuture 기능
작업콜백
- thenApply
함수형 인터페이스 Function 타입을 파라미터로 받으며, 반환 값을 받아서 다른 값을 반환해 주는 콜백이다.
앞선 계산의 결과를 콜백 함수로 전달된 Function을 실행한다. - thenAccept
함수형 인터페이스 Consumer를 파라미터로 받으며, 반환 값을 받아 처리하고 값을 반환하지 않는 콜백이다. - thenRun
함수형 인터페이스 Runnable을 파라미터로 받으며, 반환 값을 받지 않고 그냥 다른 작업을 처리하고 값을 반환하지 않는 콜백이다.
작업 조합
- allOf
여러 개의 CompletableFuture을 동시에 실행하고, 모든 작업 결과에 콜백을 실행한다.
여러 CompletableFuture를 한 번에 Blocking 할 때 아주 유용한 메서드이다. - anyOf
여러 개의 CompletableFuture 중 가장 빨리 완료된 결과에 콜백을 실행한다.
예외처리
- exceptionally
CompletableFuture에서 발생한 예외를 처리하는 데 사용된다.
함수형 인터페이스 Function을 파라미터로 받는다. - handle
CompletableFuture의 결과 또는 예외를 처리하는 데 사용된다.
(결괏값, 에러)를 반환받아 에러가 발생한 경우와 아닌 경우 모두를 처리할 수 있다.
결과 반환
- join
CompletableFuture의 결과가 사용 가능할 때까지 기다리며 결과가 사용 가능해지면 그 결과를 반환한다.
CompletableFuture가 예외를 던지면 join() 메서드는 원래 예외를 포장한 UncheckedExecutionException
반응형
>


댓글 영역